
Referred URL
http://www.codeproject.com/KB/silverlight/SLListVsOCollections.aspx
Difference between List<T>, ObservableCollection<T> and INotifyPropertyChanged
List<T>
It represents a strongly typed list of objects that can be accessed by index. It provides methods to search, sort, and manipulate lists. The List<T> class is the generic equivalent of the ArrayList class. It implements the IList<T>generic interface using an array whose size is dynamically increased as required.

Drawbacks
In ASP.NET, we simply use DataSource and DataBind() to bind the data, but in Silverlight it is slightly different. Databinding in ASP.NET is done in a stateless way - once that binding operation is completed, it's a done deal and if you want to change anything, you have to manipulate the underlying controls that were created as a result of the data binding, or else change the underlying data objects and call DataBind() again. That’s what we are used to – but it’s not a good practice.

In the sample application, the values in the list are added, removed and changed during runtime in the code behind. The changes in the list will not be updated to the UI (Datagrid).
ObservableCollection<T>
ObservableCollection is a generic dynamic data collection that provides notifications (using an interface "INotifyCollectionChanged") when items get added, removed, or when the whole collection is refreshed.
Note: WCF service proxy class in Silverlight will use this type of collection by default.

Drawbacks
It does not provide any notifications when any property in the collection is changed.

In the sample application, the values in the observable collection are added, removed and changed during runtime in the code behind. The operations (adding and removing an item) in the observable collection will be updated to the UI (Datagrid). But any change in the existing item will not be updated to the UI.
INotifyPropertyChanged
INotifyPropertyChanged is not a collection, it’s an interface used in the data object classes to providePropertyChanged notification to clients when any property value gets changed. This will allow you to raisePropertyChanged event whenever the state of the object changes (Added, Removed, and Modified) to the point where you want to notify the underlying collection or container that the state has changed.


INotifyPropertyChanged is compatible on all type of collections like List<T>, ObservableCollection<T>, etc. The code snippet which uses INotifyPropertyChanged is shown below:

public class UserNPC:INotifyPropertyChanged
{
    private string name;
    public string Name {
        get { return name; }
        set { name = value; onPropertyChanged(this, "Name"); }
    }
    public int grade;
    public int Grade {
        get { return grade; }
        set { grade = value; onPropertyChanged(this, "Grade"); }
    }

    // Declare the PropertyChanged event
    public event PropertyChangedEventHandler PropertyChanged;

    // OnPropertyChanged will raise the PropertyChanged event passing the
    // source property that is being updated.
    private void onPropertyChanged(object sender, string propertyName)
    {
        if (this.PropertyChanged != null)
        {
            PropertyChanged(sender, new PropertyChangedEventArgs(propertyName));
        }
    }
}
In the above code snippet, whenever a value is set to a property, the method “onPropertyChanged” will be called which in turn raises the PropertyChanged event.
Sometime we need to show a circular loader in WPF and/or Silverlight. We may need it in Windows Phone 7 too. In simple statement, we need to show a circular loader in various XAML applications like Silverlight, WP7 and WPF.
In this article, we will learn how to create a Circular Loader as shown in the screenshot. I will not use a single line of C# code to create this loader. Everything will be in the XAML file itself to keep the code behind file clean. Read to know more about it step-by-step and after reading this article, you will be able to create and use a circular loader like this. Source code is also available for download at the end of the page. Feel free to use it.
Setup the Project
First, we need to create a Silverlight project. Here we will create a Silverlight 4 Application project. Once you are done with the project creation, right click on the Silverlight project and add a new UserControl. We will use this as the circular loader. As shown in the below screenshot, select the "Silverlight User Control" template and provide a name "CircularLoader.xaml" and hit "Add" to continue.

This will create a new UserControl in your solution project. Once done with this step, it's time to create the UI of the loader control. Then we will integrate it to the MainPage.xaml and see how it looks.
Create the UI of the Circular Loader
Now time to create the XAML of the loader. Remember that, we will not have a single line of C# code. Everything will be done in the XAML. If you are expert with Expression Blend, you can create it very easily. But here we will use direct XAML code to demonstrate the same. It will be helpful for you to understand properly.
Let's open the usercontrol xaml file and replace the original Grid control with a ViewBox control. You may ask one question here: Why should I use a ViewBox? Yes my friend, a very good question. ViewBox will allow you to resize the content of the panel with respect to parent container. This means if you explicitly increase or decrease the size of the user control, the inner content will proportionally resize as per the container size.
Now we will add a Canvas inside the ViewBox, so that, we can properly place the circles inside it in proper (x, y) coordinates.
After this step, we need to add some Ellipse control inside the Canvas panel to create a Circle. We will fill the color of the Ellipse with the Foreground color of the UserControl. We will use proper binding to do this, as shown below:
<Ellipse Fill="{Binding Foreground, ElementName=userControl}" Height="71" Canvas.Left="121" Canvas.Top="21" Width="69" Opacity="0.3"/>
In the above code snippet, you can see that, we added Canvas.Left and Canvas.Top to position the circle. Similarly, we will add some more circles using the Ellipse control and position them properly to create a circular path.
Setting the Opacity of the Circles
We need to set the opacity of the circles to create the similar look as we wanted to develop. Opacity will ensure that, we will use the same color but different transparency to create the UI.
Find the below XAML code for reference:

Have a look into the above XAML code. You will see there how we placed the circles in proper coordinate positions. Also check the opacity that we set for each individual circles.
Adding RenderTransform to the Canvas
Once you are done with the UI, you need to set the RenderTransform to the canvas. This step is require to keep the circle rotating in the orbit. We will add a composite transform to the canvas as shown below:

Our animation that we will create in the next step will use the same transform of the canvas to rotate the circles in the circular orbit.
Find the complete code of the UI here, in case you need proper visibility on the code that we created just now:
<Viewbox x:Name="LayoutRoot" HorizontalAlignment="Left" VerticalAlignment="Top">
<Canvas x:Name="canvas" Height="323" Width="308" RenderTransformOrigin="0.5,0.5">
<Canvas.RenderTransform>
<CompositeTransform/>
</Canvas.RenderTransform>
<Ellipse Fill="{Binding Foreground, ElementName=userControl}" Height="71" Canvas.Left="121" Canvas.Top="21" Width="69" Opacity="0.3"/>
<Ellipse Fill="{Binding Foreground, ElementName=userControl}" Height="71" Width="69" Canvas.Left="194" Canvas.Top="52" Opacity="0.4"/>
<Ellipse Fill="{Binding Foreground, ElementName=userControl}" Width="69" Height="71" Canvas.Left="221" Canvas.Top="123" Opacity="0.5"/>
<Ellipse Fill="{Binding Foreground, ElementName=userControl}" Width="69" Height="71" Canvas.Left="190" Canvas.Top="198" Opacity="0.6"/>
<Ellipse Fill="{Binding Foreground, ElementName=userControl}" Height="71" Canvas.Left="121" Canvas.Top="226" Width="69" Opacity="0.7"/>
<Ellipse Fill="{Binding Foreground, ElementName=userControl}" Width="69" Height="71" Canvas.Left="48" Canvas.Top="194" Opacity="0.8"/>
<Ellipse Fill="{Binding Foreground, ElementName=userControl}" Height="71" Width="69" Canvas.Left="17" Canvas.Top="123" Opacity="0.9"/>
<Ellipse Fill="{Binding Foreground, ElementName=userControl}" Height="71" Width="69" Canvas.Left="48" Canvas.Top="52" Opacity="1.0"/>
</Canvas>
</Viewbox>
Create the Storyboard
Now what we need in this step? We need to create a smooth animation which we can achieve using the StoryBoard. We will create a Storyboard now to rotate the circles in the orbit. You can use the Expression Blend to create the animation easily. As this is a simpler code, I am just sharing the code for you here:
<UserControl.Resources>
<Storyboard x:Name="LoaderAnimation">
<DoubleAnimationUsingKeyFrames Storyboard.TargetProperty="(UIElement.RenderTransform).(CompositeTransform.Rotation)"
Storyboard.TargetName="canvas"
RepeatBehavior="Forever">
<EasingDoubleKeyFrame KeyTime="0" Value="0"/>
<EasingDoubleKeyFrame KeyTime="0:0:3" Value="360"/>
</DoubleAnimationUsingKeyFrames>
</Storyboard>
</UserControl.Resources>
The storyboard will rotate the canvas to 360 degree to give a circular motion to the circles. Also we will set the RepeatBehavior to indefinite by setting the value "Forever". Here the storyboard will be available as a Resource to the UserControl. Hence we can easily access it whenever require.
Once the storyboard has been created, we need to run it on load. The simplest approach here will be calling the Begin() method of the storyboard from code behind class. As I told, we will not write a single line in the code behind, we need to do something from the XAML which will cause the storyboard to run.
We can achieve this functionality be using the Microsoft.Expression.Interactions and System.Windows.Interactivity dll assemblies. They provides interfaces to call a storyboard on some event. To do this, we need to add the assembly references of those dlls. Add them from the "Add Reference" dialog as shown below:
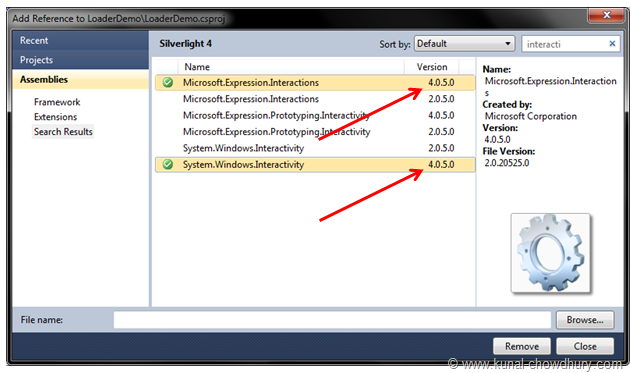
Once you added the assembly references, we will add the following xmlns namespaces in the xaml file. Those two namespace will help us to call the storyboard easily from the xaml without writing any code behind file.
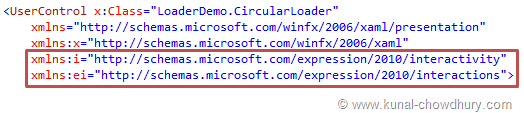
Just after the resource declaration, add the below code:
<i:Interaction.Triggers>
<i:EventTrigger EventName="Loaded">
<ei:ControlStoryboardAction Storyboard="{StaticResource LoaderAnimation}"/></i:EventTrigger>
</i:Interaction.Triggers>
This will run the storyboard from the loaded event. That means, once the usercontrol has been loaded in the UI, it will call the Storyboard to start executing the animation.
See it in Action
Upto this, our code is ready. Now, add the said CurcularLoader.xaml UserControl in the MainPage.xaml file. We will place it inside the LayoutRoot. Make sure to set a Foreground color for the circles. Build the solution and check if there are any error. If so, fix them and run the project. You will see the following UI inside the browser window:
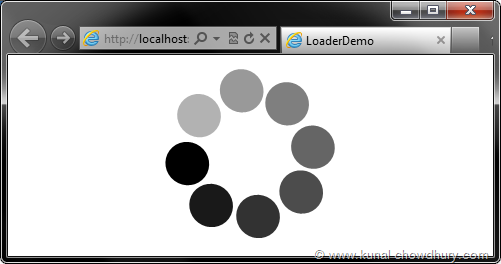
If you resize the browser, it will change the size of the circular loader in proportion to the parent panel. Now we will do a little change here. While adding the user control in the main page, we will specify it's height and width. For our example, we will use 50 x 50 as the dimension of the loader control.
Find the complete source code of the MainPage.xaml where we added the loader control:
<UserControl x:Class="LoaderDemo.MainPage"
xmlns="http://schemas.microsoft.com/winfx/2006/xaml/presentation"
xmlns:x="http://schemas.microsoft.com/winfx/2006/xaml"
xmlns:LoaderDemo="clr-namespace:LoaderDemo">
<Grid>
<LoaderDemo:CircularLoader Foreground="Black"
HorizontalAlignment="Center"
VerticalAlignment="Center"
Height="50" Width="50"/>
</Grid>
</UserControl>
Now once you run the application again, you will see the following UI where the loader control has a fixed size:

In this case, if you resize the browser, it will not change it's size because now it has a proper dimension. Hope, you enjoyed reading the article. This helped you to understand the same in depth. Now you will be able to modify the same code and implement additional behavior. You can also expose some APIs on need basis.
Download Source Code
Do you need the source code of the project for your reference? Yes, you can download it from here:
Post From:
Vin, has a post that outlines sources problems for project failure. I read this that each topic is the source of the project's problem. And then there is the suggestion that Agile can "fix" these problems. Like many suggestions around agile, there needs to be a seperation between "bad program management," actual benefical outcomes of agile, and the measureable outcomes from applying agile to specific problem domain and context in that domain.
- Requirements: (there are) Unclear (requirements), (they) lack of agreement, lack of priority, contradictory, ambiguous, imprecise.
- Resources: (there is a) Lack of resources, resource conflicts, turnover of key resources, poor planning.
- Schedules: (are) Too tight, unrealistic, overly optimistic.
- Planning: (is) Based on insufficient data, missing items, insufficient details, poor estimates.
- Risks: (are) Unidentified or assumed, not managed.
Each of these can be traced to much simpler source than just the red herring of WaterFall.It is suggested Agile can address these issues. So let's look at that conjecture a bit more.
Requirements
A Requirement is ... "A statement identifying a capability, a physical characteristic, or a quality factor that bounds a product or process need for which a solution will be pursued." - IEEE Standard 1220-2005.
Along with requirements successful projects need to define what capabilities are to be provided by the solution.
A Capability is ...“the result of a method involves a functional analysis of operational requirements. Capabilities are identified based on the tasks required… Once the required capability inventory is defined, the most cost effective and efficient options to satisfy the requirements are sought.”
So when it is said "forget requirements, tell stories instead," what does this really mean? Because a story is a requirement. A requiremment told trough the narrative of the stiry. But it's missing several things good requirements need:
- Traceability of the Requirements to the Business (or mission) Capabilities. Why is this requirement here? What other requirements are related to this requirement? What are the dependencies between this requirement and other requirements? If I drop this requirement to hold the iteration completion time, what's the impact on other requirement in the release.
- Requirements can be represented in many ways. Scenarios are common in our domain. sysML process flows, systems engineering Concept of Operations, and other "story like" narratives can be found in defense
Resources
Resource management is a critical success factor for any project. The estimating, acquisition, management, and forecasting resource demand is the role of program management. The notion that Waterfall is somehow the source of the problem is a big stretch. Bad Project Management will ignore the resource management role. Resource Management is Chapter 9 in PMBOK and other chapter in other PM guides. This is NOT a waterfall isseu, it can just as easily be an agile issue too if not looked after.
Bring in resources as needed including using temporary workers to cover peak demand.
Really, how many resources, what kinds of resources, skills, capabilities, cost, fit with team?How far ahead do we need to start recruiting these resources? Our HR department has 3 full time recruiters just scrambling everyday for PM's, Program Managers, PP&C staff, testing, cost, and all other skill sets needed on our programs.
Agile provides no unique solution here.
Schedules
If your schedule is overly optimistic, then you've got a bad schedule. Period. You're a bad project manager if you sign up for this schedule. You've violated your obligation as a PM for provide a credible probability of success. You've probably violated the ethics code of your PMP.
Either allow schedules to flex or fix them and allow features to flex. You can’t have it all.
Here's some advice we apply and provide to our clients:
- A schedule without margin is late and over budget before you start.
- How much margin needs to be determined analytically. Either through past performance analysis on one end and Monte Carlo Simulation on the other. Either way, or all ways in between mean that you have some understanding of the probabilistic nature of the durations, cost, and technical performance.
- Schedule have show the order of development at some level to maximize the value stream to the customer. This is done on multi-billion weapons systems and done in agile projects.
Planning
A Plan is a Strategy for the successful completion of the project. It's the Plan that describes the sequence of activities needed to maximize this value. Be the value autonomous landing of an F-18 on the deck of a carrier, the delivery of telecommunications services to clients, or some type business capability to customer. The notion of exchanging planning for deliverables requires very careful consideration. With a credible Plan, you cannot know what to deliver. A pile of story cards stuck to the wall is not a plan. It's a pile of story card stuck to the wall.
Plan less, deliver more. Let the deliverables guide the planning.
Which deliverables? What order are needed to minimize the duration of the project? What are the dependencies between these deliverables? Are there deliverables that depend on other deliverables? Who decides what order the deliverables appear? Is there oversight around these deliverables, their connection with the Capabilities needed for business success.
This has nothing to do with Waterfall and is not solved by Agile. Here's a sample of a Plan used for a Scrum based very large insurance program.
Risk Management
Let's start with the seminal quote:
Risk Management is how adults manage projects - Tim Lister
Vin suggests
Evaluate, prioritize and mitigate risks on every project.
Well close, here's some guidance
But the process actually is:

Referred URL :
Allowing Only Currency-Related Characters In a TextBox
There are a number of existing masked input plugins for jQuery. After trying some out I decided to roll my own JavaScript functions. I intend to come back to these and turn them into jQuery plugins, but for now they’re just JavaScript functions. As you can see in the script below, I created four functions:
- numbersOnly – allows just number inputs, whether they are from the letters at the top of the keyboard or from the number pad.
- numbersAndCommasOnly – allows number inputs and commas.
- decimalsOnly – allows numbers, commas, and periods (either from the main keyboard or the number pad).
- currenciesOnly – allows numbers, commas, periods, and the dollar sign.
In addition to the allowed characters discussed above, the functions also permit “special character key codes,” namely Delete, Backspace, left arrow, right arrow, Home, End and Tab. What keycodes are valid are listed in the variables at the top of the script; see Javascript Char Codes for a table listing the keys and their corresponding key codes.
Here is the script of interest:
// JavaScript I wrote to limit what types of input are allowed to be keyed into a textbox
var allowedSpecialCharKeyCodes = [46,8,37,39,35,36,9];
var numberKeyCodes = [44, 48, 49, 50, 51, 52, 53, 54, 55, 56, 57, 96, 97, 98, 99, 100, 101, 102, 103, 104, 105];
var commaKeyCode = [188];
var decimalKeyCode = [190,110];

function numbersOnly(event) {
    var legalKeyCode =
        (!event.shiftKey && !event.ctrlKey && !event.altKey)
            &&
        (jQuery.inArray(event.keyCode, allowedSpecialCharKeyCodes) >= 0
            ||
        jQuery.inArray(event.keyCode, numberKeyCodes) >= 0);

    if (legalKeyCode === false)
        event.preventDefault();
}

function numbersAndCommasOnly(event) {
    var legalKeyCode =
        (!event.shiftKey && !event.ctrlKey && !event.altKey)
            &&
        (jQuery.inArray(event.keyCode, allowedSpecialCharKeyCodes) >= 0
            ||
        jQuery.inArray(event.keyCode, numberKeyCodes) >= 0
            ||
        jQuery.inArray(event.keyCode, commaKeyCode) >= 0);

    if (legalKeyCode === false)
        event.preventDefault();
}

function decimalsOnly(event) {
    var legalKeyCode =
        (!event.shiftKey && !event.ctrlKey && !event.altKey)
            &&
        (jQuery.inArray(event.keyCode, allowedSpecialCharKeyCodes) >= 0
            ||
        jQuery.inArray(event.keyCode, numberKeyCodes) >= 0
            ||
        jQuery.inArray(event.keyCode, commaKeyCode) >= 0
            ||
        jQuery.inArray(event.keyCode, decimalKeyCode) >= 0);

    if (legalKeyCode === false)
        event.preventDefault();
}

function currenciesOnly(event) {
    var legalKeyCode =
        (!event.shiftKey && !event.ctrlKey && !event.altKey)
            &&
        (jQuery.inArray(event.keyCode, allowedSpecialCharKeyCodes) >= 0
            ||
        jQuery.inArray(event.keyCode, numberKeyCodes) >= 0
            ||
        jQuery.inArray(event.keyCode, commaKeyCode) >= 0
            ||
        jQuery.inArray(event.keyCode, decimalKeyCode) >= 0);

    // Allow for $
    if (!legalKeyCode && event.shiftKey && event.keyCode == 52)
        legalKeyCode = true;

    if (legalKeyCode === false)
        event.preventDefault();
}
My script is, admittedly, very US-centric. I have not tested the key codes with a non-English keyboard and for currencies I only allow a dollar sign. For the project I wrote this script for this is (currently) a non-issue since it is used within the corporate firewall and all sales are domestic, but clearly the above script would not work as well for international settings.
Applying the Currency Masking Script to a TextBox on the Page
With the above script in place you can have a textbox on the page mask its input by having the appropriate function called in response to the keydown event. The following jQuery syntax wires up this logic to all single-line textboxes that have the CSS class currenciesOnly.
$(document).ready(function () {
    $("input[type=text].currenciesOnly").live('keydown', currenciesOnly);
});
That’s it!
Formatting the Just-Entered Currency
Another requirement my client had was to format the just-entered number as a currency. That is, to change the user’s input – say, 45000 – to a formatted value like $45,000.00 immediately after their tabbed out of the textbox. To accomplish this I used Ben Dewey’s jQuery Format Currency Plugin, which you can see a demo of athttp://www.bendewey.com/code/formatcurrency/demo/. This plugin adds a formatCurrency function that you can call on a set of elements returned by a jQuery selector.
To use this plugin I updated the $(document).ready event handler shown above to also call theformatCurrency function on blur:
$(document).ready(function () {
    $("input[type=text].currenciesOnly").live('keydown', currenciesOnly)
                        .live('blur',
                                 function () {
                                     $(this).formatCurrency();
                                 }
                              );
});
In short, whenever a textbox with a CSS class of currenciesOnly is blurred, the just-blurred textbox’s inputs are formatted as a currency thanks to the formatCurrency function.


 Posts
Posts


