
Referred URL - http://www.codeproject.com/Articles/313197/Simple-way-to-Design-Tabs-in-ASP-NET
This is very simple to Implement.
Basically there will be two CSS styles.
One style will have an initial Background image and another style will have a different Background image to highlight the active Tab. On each button click, the CSS style of the button will be updated from Code Behind.
Below are the simple steps to understand this.
1. Use two images, one for initial styling and another to show the Selected Tab. (I used MS Paint to create these images. Doesn’t require much of skills)
 (Shown Initially)
 (Shown on Selected Button)
2. Create two different styles, one to show up initially (.Initial and .Initial:hover - to change the style when the mouse pointer is moved over the button) and another to show the Selected Tab (.Clicked).
  <style type="text/css">
  .Initial
  {
    display: block;
    padding: 4px 18px 4px 18px;
    float: left;
    background: url("../Images/InitialImage.png") no-repeat right top;
    color: Black;
    font-weight: bold;
  }
  .Initial:hover
  {
    color: White;
    background: url("../Images/SelectedButton.png") no-repeat right top;
  }
  .Clicked
  {
    float: left;
    display: block;
    background: url("../Images/SelectedButton.png") no-repeat right top;
    padding: 4px 18px 4px 18px;
    color: Black;
    font-weight: bold;
    color: White;
  }
  </style>
3. Create ASP.NET Buttons corresponding to each tab and set the background Image to the initial styling.
a. For each button ensure that the BorderStyle is set to "None" so that it looks like an image and not as a button.
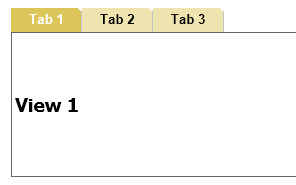
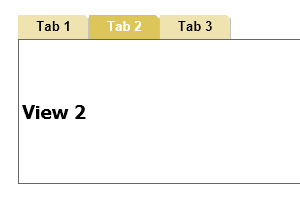
4. Create a Multi View Control and different views corresponding to each tab.
  <body style="font-family: tahoma">
  <form id="form1" runat="server">
    <table width="80%" align="center">
      <tr>
        <td>
          <asp:Button Text="Tab 1" BorderStyle="None" ID="Tab1" CssClass="Initial" runat="server"
              OnClick="Tab1_Click" />
          <asp:Button Text="Tab 2" BorderStyle="None" ID="Tab2" CssClass="Initial" runat="server"
              OnClick="Tab2_Click" />
          <asp:Button Text="Tab 3" BorderStyle="None" ID="Tab3" CssClass="Initial" runat="server"
              OnClick="Tab3_Click" />
          <asp:MultiView ID="MainView" runat="server">
            <asp:View ID="View1" runat="server">
              <table style="width: 100%; border-width: 1px; border-color: #666; border-style: solid">
                <tr>
                  <td>
                    <h3>
                      <span>View 1 </span>
                    </h3>
                  </td>
                </tr>
              </table>
            </asp:View>
            <asp:View ID="View2" runat="server">
              <table style="width: 100%; border-width: 1px; border-color: #666; border-style: solid">
                <tr>
                  <td>
                    <h3>
                      View 2
                    </h3>
                  </td>
                </tr>
              </table>
            </asp:View>
            <asp:View ID="View3" runat="server">
              <table style="width: 100%; border-width: 1px; border-color: #666; border-style: solid">
                <tr>
                  <td>
                    <h3>
                      View 3
                    </h3>
                  </td>
                </tr>
              </table>
            </asp:View>
          </asp:MultiView>
        </td>
      </tr>
    </table>
  </form>
</body>
5. On each button click, set the style of the Clicked button to take a new value.
  public partial class SimpleTabControl : System.Web.UI.Page
  {
    protected void Page_Load(object sender, EventArgs e)
    {
      if (!IsPostBack)
      {
        Tab1.CssClass = "Clicked";
        MainView.ActiveViewIndex = 0;
      }
    }

    protected void Tab1_Click(object sender, EventArgs e)
    {
      Tab1.CssClass = "Clicked";
      Tab2.CssClass = "Initial";
      Tab3.CssClass = "Initial";
      MainView.ActiveViewIndex = 0;
    }

    protected void Tab2_Click(object sender, EventArgs e)
    {
      Tab1.CssClass = "Initial";
      Tab2.CssClass = "Clicked";
      Tab3.CssClass = "Initial";
      MainView.ActiveViewIndex = 1;
    }

    protected void Tab3_Click(object sender, EventArgs e)
    {
      Tab1.CssClass = "Initial";
      Tab2.CssClass = "Initial";
      Tab3.CssClass = "Clicked";
      MainView.ActiveViewIndex = 2;
    }
  }
6. Finally you can get your desired style. (Please use the attached Zip to get the code)


0 comments