How to Prepare Your Class Library to Support Application Library Caching?
Referred URL
What is Application Library Caching?
First of all, let us discuss on "Application Library Caching". Assembly caching is not a new thing in Silverlight 4. It was present since Silverlight 3. Already we all know about the on demand download of XAP. To do this, we need to write code for downloading the external xap files using the WebClient.
And this Application Library caching does the similar thing for you very. Suppose, if you have a bigger application and used a huge external libraries, either 3rd part or your own, this easy step will help you make a separate zip file for them which can be downloaded on demand without writing any additional code.
Read more about the feature in this blog post: Application Library Caching in Silverlight 4.
Prepare Project
Before starting let us create our own Silverlight application solution, where we will have a Class library project too. It is not require to put the class library project in the same solution but for the demo purpose, we will use the same solution here.
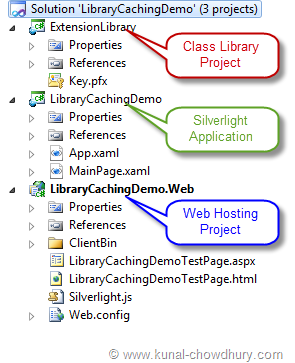
Below is our project structure where we have our own custom library called "ExtensionLibrary", one Silverlight application named "LibraryCachingDemo" and the hosting web project called "LibraryCachingDemo.Web":
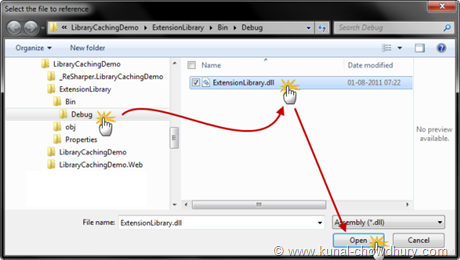
Once we are done with the project creation, we will build the project which will generate the dll file for the class library project. Just add the Assembly Reference of this DLL to the main application project and build it once again. This will create the application XAP with the assembly added inside that.
Now it's the time to split out the library out of the XAP and use the feature of Application Library Caching.
Signing the Class Library
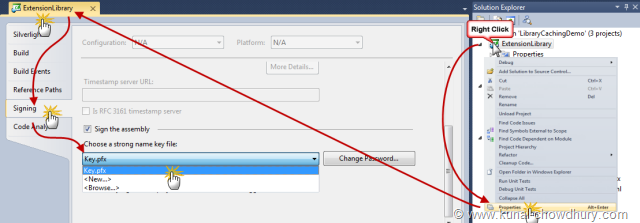
Before implementing the same in our application, it is require to sign the assembly of the library. To do this, right click on the library project and click Properties from the context menu. This will open up the properties page. As shown below, go to the "Signing" tab and create a Strong name key file and sign the assembly with that:
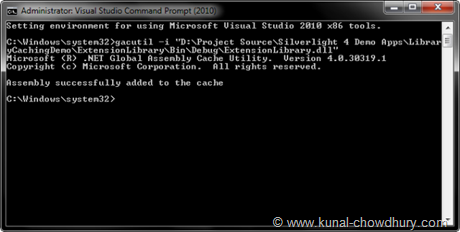
After signing the assembly, build the project to recreate the assembly which is signed with a strong key. Now you need to extract the "Public Key Token" out of the dll. To do this, the easiest process is installing the dll in the GAC by giving the command "gacutil -i <DLL_FILE_PATH>" from the Visual Studio Command Prompt. This will register it in GAC. Make sure to open the Visual Studio Command Prompt as an Administrator.
Here is the screenshot of the same:
After this step, go to the GAC and extract the public key token from the installed assembly. Note down the key as it will be require in the next step. After you get the key, you can remove the assembly from the GAC as it is not required in next steps.
Generate the Manifest
Once you have a signed copy of the assembly with a Public Key Token, go to the original dll file path (in our case, the Bin\Debug folder) and create a new file called "ExtensionLibrary.extmap.xml". Make sure that, this file has the same name of the dll assembly.
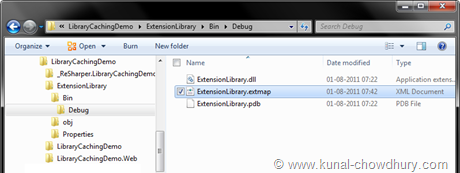
Now open the said file and add the following XML code into that:
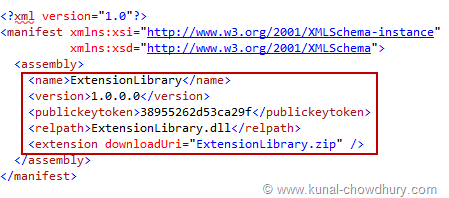
This actually adds the manifest for the dll. Make sure that, you entered the name of the assembly, version, public key token, relative path and the name of the ZIP file properly as shown above.
Here is the complete XML code for your reference:
<?xml version="1.0"?>
<manifest xmlns:xsi="http://www.w3.org/2001/XMLSchema-instance"
xmlns:xsd="http://www.w3.org/2001/XMLSchema">
<assembly>
<name>ExtensionLibrary</name>
<version>1.0.0.0</version>
<publickeytoken>38955262d53ca29f</publickeytoken>
<relpath>ExtensionLibrary.dll</relpath>
<extension downloadUri="ExtensionLibrary.zip" />
</assembly>
</manifest>
This step will ask the compiler to not include the dll inside the XAP and create a separate ZIP file for the said assembly if application library caching is set for the application.
Adding Support for Application Library Caching
This is the final step. Right click on the Silverlight Application project and go to it's properties panel. In the "Silverlight" tab, just check the "Reduce XAP size by using application library caching" option as shown below:

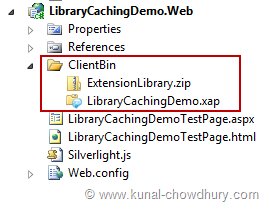
Now build your application once again and this time you will notice that one ZIP file named "ExtensionLibrary.zip" has been created in the "ClientBin" folder of the application project. Also open the XAP file and this time you will notice that the dll file is not present in the XAP.
Download
You can download the complete Source Code of the article from here:


0 comments